Deploy ASP.NET Core With Pivotal Cloud Foundry
I've been experimenting with Pivotal Cloud Foundry recently and put this quick tutorial together for deploying an ASP.NET Core application using PCF. I was amazed at how easy this was and I'm sure you will be too.
As a developer I love how PCF takes care of the cloud resource configuration for me, based on the requirements I give it and what it knows about the type of application I am deploying. Note that this tutorial is just a simple 'Hello World' style tutorial and does not show the full power of PCF.
The prerequisites for this project are
- Visual Studio 2017 (Any IDE will work, this is what I used)
- Free Pivotal Web Services Account : https://run.pivotal.io/
- CF CLI installed : https://docs.run.pivotal.io/cf-cli/install-go-cli.html
Resources:
- GitHub Repo with my code: https://github.com/bradjolicoeur/pcf-web-demo
- Pivotal Getting Started: https://pivotal.io/platform/pcf-tutorials/getting-started-with-pivotal-cloud-foundry/introduction
For this tutorial, I will be creating a new ASP.Net Core MVC application, creating a PCF manifest and then pushing the application to the Pivotal cloud. The real magic here is that PCF is going to take my manifest, compare it to my application and provision the server resources it requires automatically.
To get started, create a new ASP.NET Core Web Application using Visual Studio 2017
![e5ce675e-2164-47de-b715-78b889b330b3_vs_select_project_template[1]](https://cloud.squidex.io/api/assets/brad-jolicoeur-blog/fc959716-f805-4d84-8a08-565d218c53e1/e5ce675e-2164-47de-b715-78b889b330b3-vs-select-project-template-1-.png "e5ce675e-2164-47de-b715-78b889b330b3_vs_select_project_template[1]")
I chose to use the MVC template.
![610aac0d-c555-4e26-ab30-babcd73c1c19_vs_select_webapp_template[1]](https://cloud.squidex.io/api/assets/brad-jolicoeur-blog/682bff48-9d54-4128-92ac-afd0e07bdf67/610aac0d-c555-4e26-ab30-babcd73c1c19-vs-select-webapp-template-1-.png "610aac0d-c555-4e26-ab30-babcd73c1c19_vs_select_webapp_template[1]")
Once the project was created, I added a Manifest.yml file to the root of the project. I haven't seen the best practices on where this file should be placed in the project, but this seems to work out.
![3bb82584-36ad-443f-abd9-9cdd5656188b_vs_show_manifest_yml[1]](https://cloud.squidex.io/api/assets/brad-jolicoeur-blog/2403c8d6-f9d7-4617-b311-67b04a1b813d/3bb82584-36ad-443f-abd9-9cdd5656188b-vs-show-manifest-yml-1-.png "3bb82584-36ad-443f-abd9-9cdd5656188b_vs_show_manifest_yml[1]")
The Manifest.yml includes the instructions for PCF to build an environment for my application. This manifest is the minimum information PCF needs for creating the environment. I could add more details if I choose, and PCF will figure out the rest.
![842a4a1b-88b9-4c06-8a79-0029b4c6b09c_show_manifest_yml_contents[1]](https://cloud.squidex.io/api/assets/brad-jolicoeur-blog/e11e5f1e-2a0d-4452-bdc4-653de0d12400/842a4a1b-88b9-4c06-8a79-0029b4c6b09c-show-manifest-yml-contents-1-.png "842a4a1b-88b9-4c06-8a79-0029b4c6b09c_show_manifest_yml_contents[1]")
Once I have the manifest set, I will open an command prompt (I've already installed CF CLI) and change to the root directory of my web project. This is the same directory that contains the Manifest.yml file.
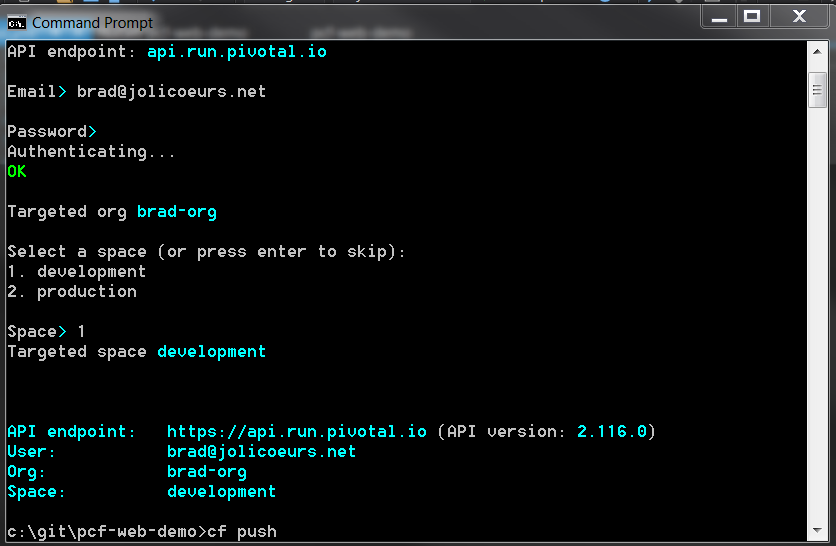
Then login using cf cli using the command: cf login -api.run.pivotal.io
CF will ask for the email and password you used to create your free pivotal web services account.
![0c20fb0a-c620-4fb6-90aa-12dce3a2010f_cf_show_login[1]](https://cloud.squidex.io/api/assets/brad-jolicoeur-blog/8fe536d2-4d79-4a9a-990f-53f7219a4148/0c20fb0a-c620-4fb6-90aa-12dce3a2010f-cf-show-login-1-.png "0c20fb0a-c620-4fb6-90aa-12dce3a2010f_cf_show_login[1]")
After authenticating you are ready to push your application with the command: cf push
![15db3ef7-b05b-4a10-987f-80e5994c0495_cf_show_push[1]](https://cloud.squidex.io/api/assets/brad-jolicoeur-blog/f5f0ce78-759d-4ec2-9ab2-d611e34b0570/15db3ef7-b05b-4a10-987f-80e5994c0495-cf-show-push-1-.png "15db3ef7-b05b-4a10-987f-80e5994c0495_cf_show_push[1]")
When push command executes you will see a lot of output showing everything PCF is doing to package your application and provision the server resources necessary. At the end it will show your application's state, in this image the service is now running.
![a492f6cf-9a21-49a9-ad2c-2768b185979d_pws_show_application_running[1]](https://cloud.squidex.io/api/assets/brad-jolicoeur-blog/59057444-31a4-4d46-875e-88ea6d06d4fb/a492f6cf-9a21-49a9-ad2c-2768b185979d-pws-show-application-running-1-.png "a492f6cf-9a21-49a9-ad2c-2768b185979d_pws_show_application_running[1]")
You can now log into Pivotal Web Services web UI to see your application running. To the far right (not in image) you will see the URL for your application.
You are done, your app is up and running in the cloud and you didn't need to think about configuring web servers. If you wanted to target Azure or AWS, the process is essentially the same.
My next area of exploration is configuration. PCF has a clever way to manage configuration variables using Git or other sources that has my interest.

About Brad Jolicoeur
Principal Architect with 20+ years building and transforming engineering organizations. Wharton Executive CTO Program graduate. Writing about architecture, distributed systems, production AI, and engineering leadership.
You May Also Like
Event Sourcing in Practice: Marten and Wolverine Working Together

Brad Jolicoeur - 06/14/2026
Fast Code, Stuck Value

Brad Jolicoeur - 05/26/2026
Coding Was Never the Bottleneck
